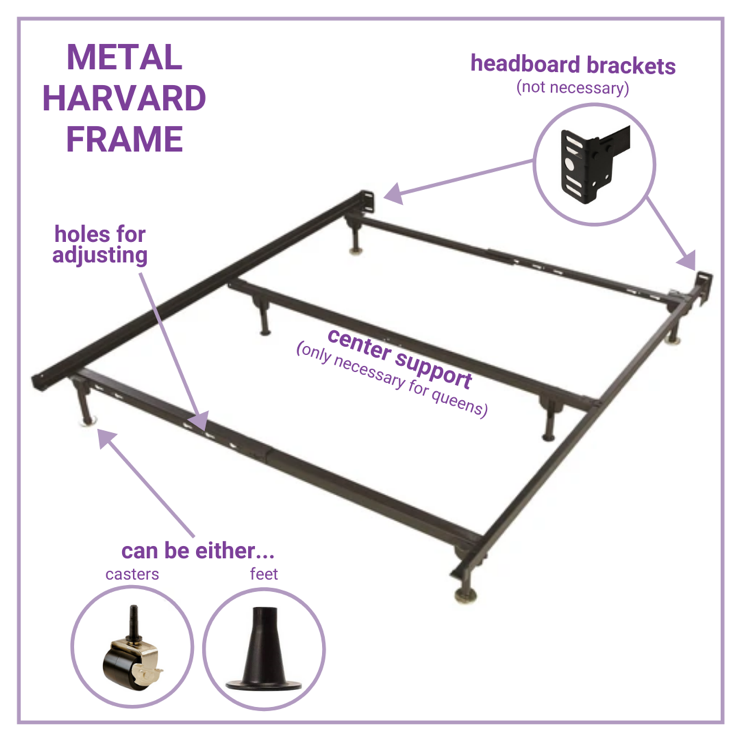
Metal bed frames (a.k.a. Harvard frames) are often, but not always, adjustable.
We do not accept headboards, footboards, wooden frames, or any size bed larger than queen.
Receiving #
- Bed frames should be duct taped together upon receipt on the dock or when picked up.
- Ask the donor what size it is and note it on the tape.
- The frames will still be inspected, but this keeps the pieces together.
- Leave on the pallets in Processing.
Inspection #
Supplies #
- Duct tape
- iPad
- Inventory cart
- Measuring stick
1. Assemble #
Assemble the frame, making sure the pieces fit together properly. See diagram below.
- Is all hardware included, even feet/wheels? There is a bin of extra wheels and feet if needed.
- Are any pieces broken or missing?
- If you have an incomplete set, hold onto it until the entire pile of unprocessed frames is gone. The pieces may still be in the pile.
- If something is broken or only fits a king bed, save the feet and put the metal in metal recycling.
2. Determine Sizes #
Inventory has 4 options: Twin, Twin-Full, Full, and Queen. A bed that adjusts to twin, full, and queen can be labeled as either “Twin-Full” or “Queen”. We tend to need more twin-full frames, so use that label in most cases. If we’re low on queen frames, label it a queen as long as it has a center support.
- There are 2 boards marked with measurements that can be used to determine size.
3. Disassemble & Tape #
Disassemble the frame and wrap together on each end using duct tape with the wheels/feet facing the same direction.
- Secure any loose wheels, feet, or hardware with duct tape

4. Label #
From the inventory check-in on an iPad, print a label and apply to a headboard bracket. Frames are listed under Beds in the software.
4. Put Away #
Put away complete frames in the third room of the warehouse.
